Sunday, December 28, 2014

Tanzer 16 -- Spinnaker Launching Chute

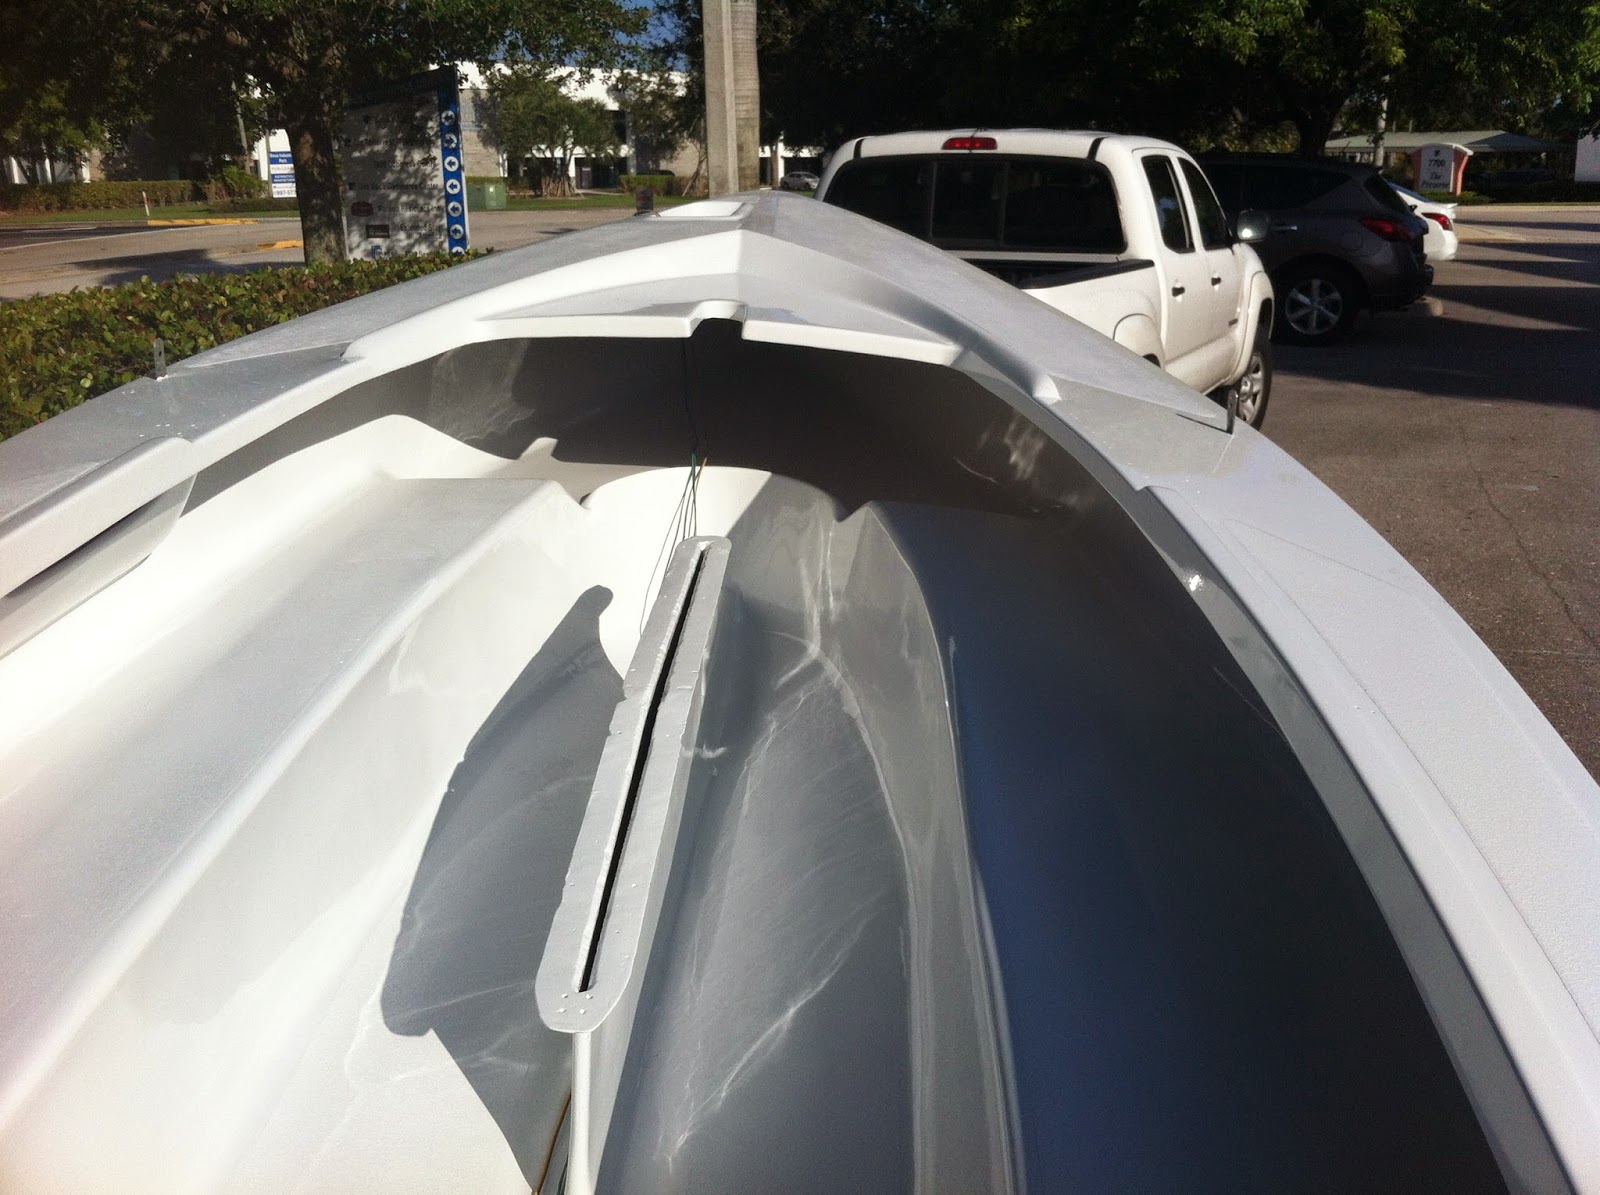
Tanzer 16 -- Spinnaker Launching Chute --December 28, 2014 -- Getting ready to paint the deck this winter and decided that it would be nice to include a spinnaker launching chute in the deck before it gets painted.  The inspiration came from Brian Mrachek.  His set-up looks like this.


He has roller furling on the jib.  This looked liked a handy way to deal with the spinnaker in a small boat.  Problem:  I can't find a source for the chute to install in the deck.  After a lot of time on the Internet, I found a supplier in UK.  

Any ideas would be appreciated.  I am not wanting to install the chute after painting.

jim


Sunday, December 14, 2014

Tanzer 16 - Another Great Refurb,

Tanzer 16 - Another Great Refurb -- December 14, 2014 -- Brian Mrachek from Florida picked up a wreck of a boat, #1460, and did a complete refurb.  When you see something like this you just want to go out and find a crappy old boat and turn it into something special the way Brian did.  The whole thing is so nicely done that we will post a few pictures here and give Brian his own page so you can see how the  the progress.  Brian is also the guy who took his boat out on a 70-mile open water race.  Great job Brian!

PS:  As soon as we get a little warm weather, I will pull 1306 out into the driveway and try out the hinged mast, gin pole raising system.  It should be just about ready--of course there will be some problems we did not anticipate.  jim

Pretty much a train wreck when he brought it home.


After cutting away bad material along the bunks, he glassed that in.
Then he painted the inside and the deck.


Then he flipped it over and painted the hull.


After more than a few months and more than a few
dollars, Brian had himself a better than new boat.
Note the roller furling for the jib.  See Brian's page to
look at the spinnaker launching system.

Monday, October 27, 2014

Tanzer 16 -- 70-mile open water race

Tanzer 16 -- 70-mile open water race, October 17, 2014 -- Here's an email you don't get just everyday.  Brian in South Florida is working on Tanzer #1460 built in 1980.  He casually mentions that he and his boat participated in, "...A 70 mi open water race last year but had to greatly improvise..."  Would love to more about that.  He is having the mast and boom painted.  I hope Brian will send us some pictures.  jim

Tuesday, October 21, 2014

Tanzer 16 --Racing small boats--good start--poor finish

Tanzer 16 --Racing small boats--good start--poor finish, October 21, 2014.  You need a good start to win, but a good start isn't enough if you don't sail your boat fast.  The committee boat provided some pictures that gave us a good look at the start and the finish.  To understand what is going on here, you need to see this diagram.  The race was held on August 28, but the conditions were exactly the same as July 17.  The starting line was laid out in a very odd way like so:


You really couldn't start on starboard tack.  The best you could hope for was to run down the line on starboard, then tack into a hole and start on port.  Port was the favored end of the line for both weather and position.  The first mark was on the port side of the line.

Dealing with the Lasers in our mixed fleet is always interesting.  If they get to the line too early, they just capsize their boat for a few seconds.  Then they right the boat, and take off like they came out of a slingshot. The sequence below is from two starts, but they were almost identical so I substituted one picture.


1.  We were barrelling down the line on starboard and could have made the C-Lark bear off.  But, we were just a tad early.  He was a little earlier.
2. We told him to hold his course and ducked behind him.  He was early and had to luff to avoid being over the line early.  The O'Day on the right was way over early and had to restart.
3.  The same thing happened the next time, but this time we tacked behind the 420 instead of the C-Lark.  Same result both times.  We got to the line about 1 second after the start going full speed.  The boats that we allowed to maintain course got to the line early.
3a. Out on the course.  We started ahead of the 420 and C-Lark both times and tried to cover their tacks. We were only successful until we reached a long windward tack.  Both of them could out point us by one or two degrees.  Both sailed a teeny bit faster.  (The C-Lark owes us a few seconds, and we owe the 420 a few more seconds on the Portsmouth Yardstick Handicapping Table.)
4.  We made up some distance on the downwind leg, but not nearly enough.  In case you can't see the sail, we are last--they were a few people behind us, but they were way behind us.  This is the part of the fleet we need to beat.

Things we learned.

  • I screwed up and didn't ease the topping lift enough.  That prevented us from flattening the main the way we should have on the upwind legs.
  • Our tacks were sharp and clean, but we need to fine tune how long we hold the jib to backwind the bow and give us that tiny extra push to the next tack.  We did bear away cleanly on the new tack with no over steering.
  • When the wind picked up to anything over 12 knots it was too difficult to use the traveler.  We need to add a block and gain a 2:1 mechanical advantage on our traveler set up. The blocks are here and we'll make that adjustment when we have the new, hinged mast step working.
  • We need to keep the boat flatter on the upwind legs by moving our weight forward, better use of the hiking stick.  We probably need to add hiking straps.  But we are a little old for that, and one of us has a plastic and steel knee.  We'll think about it!
  • We need a better pole to hold the jib out on downwind legs.  (We already got a new spinnaker pole.) 
  • We still need a new Genoa for next year.  This was a very unusual summer in Budd Inlet--good wind almost every Thursday so the regular jib was plenty of sail.  I continue to bug our sail supplier in Quebec.
Today's cliche:  It's okay to make mistakes--as long as they are new ones.

Thursday, October 9, 2014

Tanzer 16 Project Boat, Jon, repair to hull

Tanzer 16 Hull Repair -- Jon is ready to repair the bow -- October 9, 2014 -- Got an update from Jon in Saint Petersburg, Florida.  He has flipped his boat, and he's ready to begin repairs on the bottom of the bow section keel.  Gotta wonder how the former owner managed to maim it so.


That a lot of beaching!

Friday, October 3, 2014

Tanzer 16 Hinged Mast Retrofit -- Part 9 King Post Placement

Tanzer 16 Hinged Mast Retrofit -- Part 9 King Post Placement -- October 3, 2014.  Reattached the hinges to the kingpost with appropriate screws -- it was time to put the kingpost into its position on the mast step. The approach was to raise and lower the trailer tongue until the keelson was level. Since I was working alone, this was a lot of in and out of the boat--move the block under the tongue--get back in the boat--check level--adjust the tongue again...back in the boat check the level--you get the picture.  It took about 12 cycles, but finally the boat was level.

Reminder--you are seeing this as I build it.  I haven't finished yet.  There will undoubtedly be mistakes made along the way.

This is the level used to determine the horizontal level of the keelson an
plumb of the king post.  In this picture, the plug has been attached to the
mast step top plate.  See the outline drawn on wood.  Counter sunk 
1/4 SS machine screws with lock nuts held it tight. 


Once the keelson was level in the horizontal plane, I adjusted the placement of the kingpost (using the level) until it was vertical.  That's as close as I can get without the boat in the water.  That position was marked on the mast step plate by tracing around the kingpost.  The plug was bolted into position.  The plate was reinstalled and the kingpost was installed.  There was enough room to put two #10 SS 3/4 sheet metal screws through the kingpost and into the plug.

King post in final position, mast step plate reinstalled.
This is more rigid than the mast ever was when it was
just rattling around in its slot.


This is as close as the kingpost can be located until the boat is in the water and correctly loaded.

Next steps:  Add two fairleads to the deck and rig the new mast with standing rigging, halyards and topping lift.


Thursday, October 2, 2014

Tanzer 16 Hinged Mast Retrofit --Part 8 Mast Cutting Day -- October 2, 2014.

Tanzer 16 Hinged Mast Retrofit --Part 8 Mast Cutting Day -- October 2, 2014.  Today is finally the day that both of us are available to take a hack saw to the 24 feet of mast.  We'll remove a couple of feet from the bottom; that will be the king post.

Reminder--you are seeing this as I build it.  I haven't finished yet.  There will undoubtedly be mistakes made along the way.

First order of business--build a miter box for this job.  Some scrap 3/4 plywood fashioned into a box should do the job.  I made it just big enough to hold the mast tight if you roll it over and lock it in with clamps.  It's about 24 inches long.  (Just finished a cabinet job so oak scraps are abundant.)

Of course a jig was needed to make the jig.  Blocks were clamped around
the jig to make sure that the hack saw stayed on the line as we cut
through the walls of the miter box.


Then we needed a way to hold the mast flat; I don't have a 24-foot long work bench.  But, I do have a table saw that is the same height as the work bench--35 1/2 inches.  (Actually the table saw is 1/8" taller than the work bench so the bench can be an outfeed platform for the saw.)  My router table is a little taller than the table saw, and we added this little platform to 2 saw horses.  Between the four supports, we will have 24 feet of support for the mast.  Of course we will need to open the shop door so the mast can stick outside.

With enough scraps, a few nails, some patience, plenty of clamps, and
some patience you can rig up almost anything.


Next question -- how long to make the king post?  I ran a string from the transom over the snubbing winch. If the king post were 24 inches tall, the  mast could lay on the transom and still clear the winch.  Then I added an inch in case we want to take out the hefty new mast step and go back to the original.  So--25 inches and another 1/2--just for safety.  This looks kind of like the spacing on the old Tanzer's that had hinged masts.

Old photo that I found scouring ads for the comps page.


Cutting begins at 3:30.  Hope it is a boring routine procedure.  I will finish this post tomorrow.

Success! Before Tony arrived, I made a last minute adjustment to the miter box.  The blade was not quite perpendicular on the back side so I cut the slot bigger and added a new pieces--like so:


After a beer and a little pre-planning we got down to business.  The mast was adequately supported by the four tables, and we clamped the miter box in position.  After quadruple checking, we decided to make the cut 25 1/2 inches from the bottom of the mast.  Put a new blade in the hacksaw--easy cutting.

Because we had spent so much time on preparing for this step, the actual
cutting was kind of anti-climatic.


In this picture you can see four clamps holding the mast.  We used six--
and that was barely enough.  The mast has to be locked down tight, and
the miter box even tighter.


Then we attached the hinges with stainless steel screws into the plugs.  I will need to go back today or tomorrow and change the screws to 3/4-inch # 10's, but #8's worked for the moment.  The 1" length screws bottomed out on the forward bolts.

We were a little pressed for time, but couldn't resist seeing if all the work had paid off.  The new king post dropped into place perfectly.  It is  much more sturdy than the original set-up.

The debris at the bottom are styro beads that fell out
everywhere.  We caught what we could in a coffee can.


Next step:  Final placement on the mast step so the king post is perpendicular to the keelson.

Today's Cliche:  Prior planning prevents piss poor performance--mostly--a little luck couldn't hurt.

Sunday, September 21, 2014

Tanzer 16 Hinged Mast Retrofit -- Part 7 -- Mast crutch


Tanzer 16 Hinged Mast Retrofit --Part 7 Mast Crutch  -- September 20, 2014. Still waiting on crew Tony to come help cut the mast so I decided to make a crutch to help with the mast raising.  A crutch will be more convenient than hauling a ladder down to the boat launch.

First thing needed?  A pair of pintles to insert in the transom gudgeons.  Since they are about 50 bucks each, I decided to make them.  With no access to a welder, they had to screw together.  Like so:


Since I will probably put a tack weld on each side of the pintle later, I used metal brackets.  Plywood could serve just as well and require a lot less time.  A piece of 3/8" steel rod fits into the gudgeons nicely.  Drilling the holes in the rod is much easier if you file one side flat and use a center punch to mark the hole.  When I fitted it on the boat, I realized the little keeper that is supposed to secure the rudder to the gudgeons is in the way.  I plan to just bend it to the side.  It's pretty much useless anyway.  That's why you see many boats for sale that need a rudder.  Much better solution:  Drill hole in a rudder pintle and secure it with a ring every time you go out.  Thusly:


The part that holds the mast (Would you call that the crotch of the crutch?) is some MDO scrap bigger than the mast.  The board is just a piece of oak plywood I had laying on the shelf--a 2x4 would work. The board is 6 feet long and about 4 inches wide.  Once the mast has been hooked into the hinge, we will be able to push it up in the air about five feet above the stern deck.  That will help a lot with sorting out the lines and rigging and give us a nice head start when we use the gin pole and winch to raise the mast.


Today's Cliche:  No job is so simple that it can be done in one trip to the store.

Friday, September 19, 2014

Tanzer 16 Hinged Mast Retrofit -- Part 6 -- Attaching the plugs to the hinge

Tanzer 16 Hinged Mast Retrofit -- Part 6 -- Attaching the plugs to the hinge  -- September 19, 2014.   I used to make fewer mistakes when I smoked.  I would sit down and look at the job, think a bit, and then say to myself, "Hell, that isn't going to work."  Luckily I got called away after I layed out the work to drill the holes in the hinge.  I centered the plugs fore and aft on the hinge.  Oops!  When I got back I realized the mast is a different shape than the plug.  This is the real layout.

Remember--you are seeing this as I build it.  I haven't finished yet.  There will undoubtedly be mistakes made along the way.  Don't take a hacksaw to your mast until we see if this works.  jim

This drawing was just used to obtain the rough spacing.  Unfortunately
only one of the factory drilled holes would fit one of the plug drilled
holes.


With the rough spacing established, time to drill holes in the plugs.  Find the centerline by making the outline of the plug on paper.  Then cut it out, fold it in half--centerline line.


I was incredibly careful when drilling the holes in the hinge and the plugs, and the plugs still were not exactly lined up square on the hinge.  So I did what all home shop guys do; I made the plug holes a tad bigger and lined the plugs up square and then bolted them down tight.  I used stainless fasteners and put some silicone under the plugs and in the holes.  You could probably drill the holes in the hinge with a hand-held drill, but the steel is extremely hard; you will need a very sharp bit, and a drill press really helps.

You won't be seeing these nuts again once they are attached to the mast
so use lock nuts with nylon inserts.


The final result fit really well.  Now it really is time to sailor-up and cut the mast.  My crew isn't available until next week so it will have to wait.  Only eight months until the next race.

Some stainless sheet metal screws will attach the mast and kingpost to the 
plugs.


(Looking at these pictures, I'm thinking maybe my workbench top could use a new sheet of Masonite.)

Today's cliche:  The nice thing about stating the obvious is that you will only be wrong about 30 percent of the time.


Sunday, September 14, 2014

Tanzer 16 Hinged Mast Retrofit -- Part 5 -- Installing the brace and and the base (step) for the king post

Tanzer 16 Hinged Mast Retrofit -- Part 5 -- Installing the brace and and the base (step) for the king post -- September 14, 2014.  Installing the deck brace was pretty straight forward.  The base was another matter.  Remember--you are seeing this as I build it.  I haven't finished yet.  There will undoubtedly be mistakes made along the way.  Don't take a hacksaw to your mast until we see if this works.  jim

To install the brace, I just clamped the brace in place, drilled some holes with counter sinks and fastened it all together.  Well, it was almost that easy.  First I spent an hour agonizing over the exact location.  I used jacks to level the trailer, dropped plumb bobs, and messed about with levels.  I don't know what exactly I was looking for, but I couldn't find it.  Finally I realized that for 41 years, the mast has just been rattling around inside the over-sized slot and the bottom hasn't been fastened to anything.  So,  what the heck!  Let's just get it close that will probably be better than it was--And, when the boat is sitting in the water, we can drop a plumb bob and shim the mast to true vertical.  Therefore  I just centered the hole in the slot and called it good.


The caulk is important to keep water from entering the plywood substrate
of the deck.


Installation of the base (step) was a little more interesting.  It was tight--really tight.  To drill the holes through the keelson I needed a very short bit and a right angle drill.  Like this:


It did go in, but in retrospect, maybe I should have stuck with the original fitting bolted to the keelson or just used one bolt in the middle of the base assembly.  When I cut the mast, I will hedge my bets by leaving an extra 3/4" so that the base mount can be changed back to the original fitting if needed.

To get the final fit, the port side needed some extra planing and the bottom
had to be shortened by one inch.  But, it is a sturdy little momma!


Next:  It's time to sailor-up and cut the mast.  This will be the first irreversible thing we have done.  I already made the special miter box for this operation and I think I know how to support the 24 feet of mast while we cut it.  (Work bench, table saw and rolling table with some spacers added.)  But, first I need to take a week or two off and do some leaf raking, firewood splitting, and actually do some things for my day job.  I will get back to you.

Today's Cliche:  God gave us the White Sox to remind us that anybody can have a bad century or two.

Friday, September 12, 2014

Tanzer 16 Hinged Mast Retrofit -- Part 4 -- making the deck brace for the king post

Tanzer 16 Hinged Mast Retrofit -- Part 4 -- making the deck brace for the king post -- September 13, 2014.  With the base for the king post (mast step) complete, it is time to create a deck brace that will hold the king post in position.  The idea is simple, but the execution requires some special tools, some precision work, and a good measure of messing about.  Remember--you are seeing this as I build it.  I haven't finished yet.  There will undoubtedly be mistakes made along the way.  Don't take a hacksaw to your mast until we see if this works.  jim

You need to cut a hole pretty much the exact shape of the outside of the mast.  That hole needs to be dead center over the top the keelson.  It needs to be in line with the centerline of the boat. It needs to hold the mast perpendicular to the keelson.  It should probably be centered in the deck slot for the mast. That is a lot to ask from what seems a simple hole in a board.  Here is the idea I stared with:

The spacers on top of the board are to provide clearance for the deck.
The edges of the deck have a lip.


To copy the shape of the mast's outside, just get a piece of nice plywood and trace around the mast.  Cut outside the line; then file and sand to final size.  I happened to have a little piece of MDO scrap laying around. This tear-drop shaped piece fits the outside nicely.

Not perfect like the plugs, but pretty close.


Then you take this pattern and screw it down to a board that will be the template for cutting the hole.  I kept using my little scraps of 1/2- inch MDO.  Then you get a router with an up-cut spiral cutting bit and put it in a router that has a pattern cutting sleeve.  Like this:

I used more scraps of MDO to support the router so it didn't tip on the
pattern. A small trim router works best on this kind of pattern.


Now you end up with a hole in the MDO.  That is the pattern you will use to cut the hole in the deck brace. You will have to change to a bigger guide (wider in diameter) and experiment until the hole you cut is just the right size. It took me three tries.  I ended up adding foil tape around the guide until it produced a hole that was a tight fit.  You need patience for this part of the job.

You can seem some of the test cuts under the actual board.


The final result from four or five hours of messing about was a hole that met all the requirements.

Pretty nice fit.  Certainly more snug than the deck slot
made by Tanzer.


Next:  Adding the spacers and mounting the brace under the deck.

Today's Cliche:  There are stupid questions.  They are asked by stupid people at the end of long, stupid meetings.  Stupid bosses attempt to answer them.


Monday, September 8, 2014

Tanzer 16 Hinged Mast Retrofit -- Part 3 -- making the base for the king post

Tanzer 16 Hinged Mast Retrofit -- Part 3 -- making the base for the king post -- September 8, 2014.  So far we found a spare mast to experiment on, purchased a hinge, and made the plugs for the mast. Time to make the new kingpost base.  Reminder--you are seeing this as I build it.  I haven't finished yet.  There will undoubtedly be mistakes made along the way.

You could keep this really simple.  You could just drill a hole in the mast base and bolt it into the keelson..As long as you position it so that the brace on the deck and the attachment point on the keelson are in the right place, it will probably work. That's what I intended to do.  I even drilled the hole for a 1/4" stainless bolt.

I didn't use a drill press, because I didn't want to make a fixture to hold
the casting, but I was very careful to make sure the hole was perpendicular
to the plane of the keelson.


Then it occurred to me that I would like the kingpost base to be a little more beefy.  And, I wanted the ability to move it fore and aft if I made a mistake--I was not trying to make it adjustable under sail--that's a rule breaker. (Eh, probably all of this is a rule breaker.  I would check with the measurer if you race in one-design fleet.)

Not real precise planning, but I thought I would just climb in and out of the
boat and figure out the sizes as I went along.  I did make it 11 inches long. I
decided later to leave out one piece of oak so the mast would only be
raised 3/4 of an inch.


To build this, you need to capture the angle between the floor and the keelson.  In my boat it is about 30 degrees.  I used a bevel gauge to find the angle.  I cut four pieces of oak with that angle.  The two inside pieces were the same height as the  keelson.  The outside pieces were wider.  Of course it's a boat  so everything is a curve.  The tops have to be tapered --just lay the side piece on the bottom and hold it tight against the keelson.  Then drag a pencil along the top of the keelson and cut the pieces off with a band saw.

I just cut four pieces wider than I needed them and then went back to 
the boat to get the height and taper to cut the top.  You really can't do this
with a hand saw.


I used a band saw to get the right taper on the top--the front is about
a 1/2" shorter than the top--the bottom rises as it nears the bow--it's a boat.
You could use a hand saw or jig saw for this operation.


Leave the outside ones a little taller so you can plane them to fit.

Then after some dinking around to get the width exactly right you can make a cap piece.


Everything needs to fit snugly around the keelson.  Screw it together--don't glue it.  The final assembly will look like this.  Put polyurethane sealer on everything.  You will bolt it through the keelson with 1/4 or 5/16 stainless bolts.  You don't want them too low or too far forward since you will have to get a wrench on these bolts when you install the support over the keelson.

High obligue view--plug is just sitting there.


End view.  Glue the two side pieces together,
but don't  glue the top plate down.  You
will be removing it several times before you're
through.


For now keep the screws in the top plate and the side plates loose.  You will have to take the support out and disassemble it so that you can attach a plug once you determine the final position of the plug--and hence the angle of the kingpost to the keelson.

At least, that's How I think this is going to work when I install it.  Remember; I am just making this up as I go along!

Right now the base weighs about six pounds--a lot of weight but worth it if it makes it easier to raise the mast.  I will just leave the outboard at home and sit a little more toward the back.

Next up:  The deck brace.

Today's Cliche:  A job is what you do to make a living.  Your hobby is what you do to make the job tolerable.

Monday, September 1, 2014

Tanzer 16 Hinged Mast Retrofit -- Part 2 -- making the attachment plugs

Tanzer 16 Hinged Mast Retrofit -- Part 2 -- making the attachment plugs  -- September 2, 2014 -- Now that we had the mast and the hinge, we had to come up with a way to attach the pieces together.  Some plugs for the mast.  O'Day sells those along with the hinge, but of course they wouldn't fit this mast.  So--first to capture the exact shape of the inside of the mast the fitting that attaches the mast to the keelson was removed.

Try not to loose too many of the little styrene beads.  They keep the water
out if you capsize.


Then plaster poured into an old container created a mold of the mast side of the old plug.  That allowed us to make an exact tracing.  I explored the idea of having the plugs cast out of aluminum or resin and called a friend to makes tooling for resin casting.  He suggested I find someone with a sand casting shop or make it out of wood.  "The have been using wood on boats for a few thousand years," he didn't say too sarcastically.

I used Fix-It-All, but plaster would have worked just fine.
I just wanted something more accurate than tracing the
outline with a pencil.


This is what I took to Ron.  He is such a perfectionist that he gave me
three samples--one cut in the middle of the line, one to the outside of the 
line and another to the inside of the line. (His shop is cleaner that most 
restaurants and some operating rooms.)


I had a nice piece of  2-inch thick oak provided by crew, Tony. At this point, I could have gone over to the band saw and cut the plugs and sanded them down to an exact fit--well, a pretty close fit--I wanted it nicer.
So-- planed the board down so both sides were clean and parallel.  The oak board and the pattern then went to Ron who owns a Shop Bot and he created some 1 1/2 inch thick plugs of that fit the mast nicely.

I asked Ron to make three of these plugs because I am thinking that
I would like to improve the mast step on the keelson while we are this
deep into the project.


Next step: Fabricate the base for the mast step on the keelson.  Of course it won't be the mast step any longer; it will be the base for the king post.

Today's Cliche:  The Internet contains vast amounts of information, but not a scrap of judgment or wisdom.

Sunday, August 31, 2014

Tanzer 16 Hinged Mast -- Part 1 --extra mast & finding the hinge

Tanzer 16 Hinged Mast Retrofit -- Part 1 -- extra mast & finding the hinge  -- September 1, 2014  My first step was to find an extra mast for my boat.  If I wanted to take a hacksaw to a mast that is no longer being made, I felt I should start with an extra mast.  If I get this right, and document it properly, maybe others can approach this job with enough confidence to skip the "get a spare mast" step.

A new mast would cost about $400.  Since the companies I located were on the East Coast, and I am in Olympia, WA, shipping was going to be a problem.  Turns out that if they can drop it off at a recognized commercial address, in my case a friendly local lumber yard, the shipping costs drop down to about $250--of course that doesn't include the cost of any  fittings that you will be robbing from your old mast.

But!  I got lucky. A fellow down in Vancouver, Washington had put a Ranger 16 mast on his Tanzer, and we struck a deal for his old mast--200 bucks, and I drive down and pick it up.  Bonus--it had a complete set of fittings on the mast.  He threw in the old shrouds for another 25 dollars.  Thank you Ralph--see post June 23, 2014.

Ralph is the guy who did the total refurb on his Tanzer--like new boat and
trailer, with full cover, and nice sails.  He was only asking 4 thou--bargain.  
I would have bought it if I weren't already emotionally invested in my own.
boat.


The next task is to find a hinge.  O'Day was the answer.  They are still making their boat, current count 10,000 units, and they still make parts.  The hinge came from D & R Marine (http://www.drmarine.com) cost: About 51 bucks plus shipping.

This is the small hinge--they make a larger one, but this seems appropriate.


Next part:  Getting some plugs to attach the mast to the hinge.