Pages

Sunday, September 21, 2014

Tanzer 16 Hinged Mast Retrofit -- Part 7 -- Mast crutch


Tanzer 16 Hinged Mast Retrofit --Part 7 Mast Crutch  -- September 20, 2014. Still waiting on crew Tony to come help cut the mast so I decided to make a crutch to help with the mast raising.  A crutch will be more convenient than hauling a ladder down to the boat launch.

First thing needed?  A pair of pintles to insert in the transom gudgeons.  Since they are about 50 bucks each, I decided to make them.  With no access to a welder, they had to screw together.  Like so:


Since I will probably put a tack weld on each side of the pintle later, I used metal brackets.  Plywood could serve just as well and require a lot less time.  A piece of 3/8" steel rod fits into the gudgeons nicely.  Drilling the holes in the rod is much easier if you file one side flat and use a center punch to mark the hole.  When I fitted it on the boat, I realized the little keeper that is supposed to secure the rudder to the gudgeons is in the way.  I plan to just bend it to the side.  It's pretty much useless anyway.  That's why you see many boats for sale that need a rudder.  Much better solution:  Drill hole in a rudder pintle and secure it with a ring every time you go out.  Thusly:


The part that holds the mast (Would you call that the crotch of the crutch?) is some MDO scrap bigger than the mast.  The board is just a piece of oak plywood I had laying on the shelf--a 2x4 would work. The board is 6 feet long and about 4 inches wide.  Once the mast has been hooked into the hinge, we will be able to push it up in the air about five feet above the stern deck.  That will help a lot with sorting out the lines and rigging and give us a nice head start when we use the gin pole and winch to raise the mast.


Today's Cliche:  No job is so simple that it can be done in one trip to the store.

Friday, September 19, 2014

Tanzer 16 Hinged Mast Retrofit -- Part 6 -- Attaching the plugs to the hinge

Tanzer 16 Hinged Mast Retrofit -- Part 6 -- Attaching the plugs to the hinge  -- September 19, 2014.   I used to make fewer mistakes when I smoked.  I would sit down and look at the job, think a bit, and then say to myself, "Hell, that isn't going to work."  Luckily I got called away after I layed out the work to drill the holes in the hinge.  I centered the plugs fore and aft on the hinge.  Oops!  When I got back I realized the mast is a different shape than the plug.  This is the real layout.

Remember--you are seeing this as I build it.  I haven't finished yet.  There will undoubtedly be mistakes made along the way.  Don't take a hacksaw to your mast until we see if this works.  jim

This drawing was just used to obtain the rough spacing.  Unfortunately
only one of the factory drilled holes would fit one of the plug drilled
holes.


With the rough spacing established, time to drill holes in the plugs.  Find the centerline by making the outline of the plug on paper.  Then cut it out, fold it in half--centerline line.


I was incredibly careful when drilling the holes in the hinge and the plugs, and the plugs still were not exactly lined up square on the hinge.  So I did what all home shop guys do; I made the plug holes a tad bigger and lined the plugs up square and then bolted them down tight.  I used stainless fasteners and put some silicone under the plugs and in the holes.  You could probably drill the holes in the hinge with a hand-held drill, but the steel is extremely hard; you will need a very sharp bit, and a drill press really helps.

You won't be seeing these nuts again once they are attached to the mast
so use lock nuts with nylon inserts.


The final result fit really well.  Now it really is time to sailor-up and cut the mast.  My crew isn't available until next week so it will have to wait.  Only eight months until the next race.

Some stainless sheet metal screws will attach the mast and kingpost to the 
plugs.


(Looking at these pictures, I'm thinking maybe my workbench top could use a new sheet of Masonite.)

Today's cliche:  The nice thing about stating the obvious is that you will only be wrong about 30 percent of the time.


Sunday, September 14, 2014

Tanzer 16 Hinged Mast Retrofit -- Part 5 -- Installing the brace and and the base (step) for the king post

Tanzer 16 Hinged Mast Retrofit -- Part 5 -- Installing the brace and and the base (step) for the king post -- September 14, 2014.  Installing the deck brace was pretty straight forward.  The base was another matter.  Remember--you are seeing this as I build it.  I haven't finished yet.  There will undoubtedly be mistakes made along the way.  Don't take a hacksaw to your mast until we see if this works.  jim

To install the brace, I just clamped the brace in place, drilled some holes with counter sinks and fastened it all together.  Well, it was almost that easy.  First I spent an hour agonizing over the exact location.  I used jacks to level the trailer, dropped plumb bobs, and messed about with levels.  I don't know what exactly I was looking for, but I couldn't find it.  Finally I realized that for 41 years, the mast has just been rattling around inside the over-sized slot and the bottom hasn't been fastened to anything.  So,  what the heck!  Let's just get it close that will probably be better than it was--And, when the boat is sitting in the water, we can drop a plumb bob and shim the mast to true vertical.  Therefore  I just centered the hole in the slot and called it good.


The caulk is important to keep water from entering the plywood substrate
of the deck.


Installation of the base (step) was a little more interesting.  It was tight--really tight.  To drill the holes through the keelson I needed a very short bit and a right angle drill.  Like this:


It did go in, but in retrospect, maybe I should have stuck with the original fitting bolted to the keelson or just used one bolt in the middle of the base assembly.  When I cut the mast, I will hedge my bets by leaving an extra 3/4" so that the base mount can be changed back to the original fitting if needed.

To get the final fit, the port side needed some extra planing and the bottom
had to be shortened by one inch.  But, it is a sturdy little momma!


Next:  It's time to sailor-up and cut the mast.  This will be the first irreversible thing we have done.  I already made the special miter box for this operation and I think I know how to support the 24 feet of mast while we cut it.  (Work bench, table saw and rolling table with some spacers added.)  But, first I need to take a week or two off and do some leaf raking, firewood splitting, and actually do some things for my day job.  I will get back to you.

Today's Cliche:  God gave us the White Sox to remind us that anybody can have a bad century or two.

Friday, September 12, 2014

Tanzer 16 Hinged Mast Retrofit -- Part 4 -- making the deck brace for the king post

Tanzer 16 Hinged Mast Retrofit -- Part 4 -- making the deck brace for the king post -- September 13, 2014.  With the base for the king post (mast step) complete, it is time to create a deck brace that will hold the king post in position.  The idea is simple, but the execution requires some special tools, some precision work, and a good measure of messing about.  Remember--you are seeing this as I build it.  I haven't finished yet.  There will undoubtedly be mistakes made along the way.  Don't take a hacksaw to your mast until we see if this works.  jim

You need to cut a hole pretty much the exact shape of the outside of the mast.  That hole needs to be dead center over the top the keelson.  It needs to be in line with the centerline of the boat. It needs to hold the mast perpendicular to the keelson.  It should probably be centered in the deck slot for the mast. That is a lot to ask from what seems a simple hole in a board.  Here is the idea I stared with:

The spacers on top of the board are to provide clearance for the deck.
The edges of the deck have a lip.


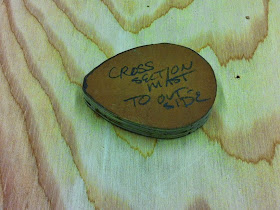
To copy the shape of the mast's outside, just get a piece of nice plywood and trace around the mast.  Cut outside the line; then file and sand to final size.  I happened to have a little piece of MDO scrap laying around. This tear-drop shaped piece fits the outside nicely.

Not perfect like the plugs, but pretty close.


Then you take this pattern and screw it down to a board that will be the template for cutting the hole.  I kept using my little scraps of 1/2- inch MDO.  Then you get a router with an up-cut spiral cutting bit and put it in a router that has a pattern cutting sleeve.  Like this:

I used more scraps of MDO to support the router so it didn't tip on the
pattern. A small trim router works best on this kind of pattern.


Now you end up with a hole in the MDO.  That is the pattern you will use to cut the hole in the deck brace. You will have to change to a bigger guide (wider in diameter) and experiment until the hole you cut is just the right size. It took me three tries.  I ended up adding foil tape around the guide until it produced a hole that was a tight fit.  You need patience for this part of the job.

You can seem some of the test cuts under the actual board.


The final result from four or five hours of messing about was a hole that met all the requirements.

Pretty nice fit.  Certainly more snug than the deck slot
made by Tanzer.


Next:  Adding the spacers and mounting the brace under the deck.

Today's Cliche:  There are stupid questions.  They are asked by stupid people at the end of long, stupid meetings.  Stupid bosses attempt to answer them.


Monday, September 8, 2014

Tanzer 16 Hinged Mast Retrofit -- Part 3 -- making the base for the king post

Tanzer 16 Hinged Mast Retrofit -- Part 3 -- making the base for the king post -- September 8, 2014.  So far we found a spare mast to experiment on, purchased a hinge, and made the plugs for the mast. Time to make the new kingpost base.  Reminder--you are seeing this as I build it.  I haven't finished yet.  There will undoubtedly be mistakes made along the way.

You could keep this really simple.  You could just drill a hole in the mast base and bolt it into the keelson..As long as you position it so that the brace on the deck and the attachment point on the keelson are in the right place, it will probably work. That's what I intended to do.  I even drilled the hole for a 1/4" stainless bolt.

I didn't use a drill press, because I didn't want to make a fixture to hold
the casting, but I was very careful to make sure the hole was perpendicular
to the plane of the keelson.


Then it occurred to me that I would like the kingpost base to be a little more beefy.  And, I wanted the ability to move it fore and aft if I made a mistake--I was not trying to make it adjustable under sail--that's a rule breaker. (Eh, probably all of this is a rule breaker.  I would check with the measurer if you race in one-design fleet.)

Not real precise planning, but I thought I would just climb in and out of the
boat and figure out the sizes as I went along.  I did make it 11 inches long. I
decided later to leave out one piece of oak so the mast would only be
raised 3/4 of an inch.


To build this, you need to capture the angle between the floor and the keelson.  In my boat it is about 30 degrees.  I used a bevel gauge to find the angle.  I cut four pieces of oak with that angle.  The two inside pieces were the same height as the  keelson.  The outside pieces were wider.  Of course it's a boat  so everything is a curve.  The tops have to be tapered --just lay the side piece on the bottom and hold it tight against the keelson.  Then drag a pencil along the top of the keelson and cut the pieces off with a band saw.

I just cut four pieces wider than I needed them and then went back to 
the boat to get the height and taper to cut the top.  You really can't do this
with a hand saw.


I used a band saw to get the right taper on the top--the front is about
a 1/2" shorter than the top--the bottom rises as it nears the bow--it's a boat.
You could use a hand saw or jig saw for this operation.


Leave the outside ones a little taller so you can plane them to fit.

Then after some dinking around to get the width exactly right you can make a cap piece.


Everything needs to fit snugly around the keelson.  Screw it together--don't glue it.  The final assembly will look like this.  Put polyurethane sealer on everything.  You will bolt it through the keelson with 1/4 or 5/16 stainless bolts.  You don't want them too low or too far forward since you will have to get a wrench on these bolts when you install the support over the keelson.

High obligue view--plug is just sitting there.


End view.  Glue the two side pieces together,
but don't  glue the top plate down.  You
will be removing it several times before you're
through.


For now keep the screws in the top plate and the side plates loose.  You will have to take the support out and disassemble it so that you can attach a plug once you determine the final position of the plug--and hence the angle of the kingpost to the keelson.

At least, that's How I think this is going to work when I install it.  Remember; I am just making this up as I go along!

Right now the base weighs about six pounds--a lot of weight but worth it if it makes it easier to raise the mast.  I will just leave the outboard at home and sit a little more toward the back.

Next up:  The deck brace.

Today's Cliche:  A job is what you do to make a living.  Your hobby is what you do to make the job tolerable.

Monday, September 1, 2014

Tanzer 16 Hinged Mast Retrofit -- Part 2 -- making the attachment plugs

Tanzer 16 Hinged Mast Retrofit -- Part 2 -- making the attachment plugs  -- September 2, 2014 -- Now that we had the mast and the hinge, we had to come up with a way to attach the pieces together.  Some plugs for the mast.  O'Day sells those along with the hinge, but of course they wouldn't fit this mast.  So--first to capture the exact shape of the inside of the mast the fitting that attaches the mast to the keelson was removed.

Try not to loose too many of the little styrene beads.  They keep the water
out if you capsize.


Then plaster poured into an old container created a mold of the mast side of the old plug.  That allowed us to make an exact tracing.  I explored the idea of having the plugs cast out of aluminum or resin and called a friend to makes tooling for resin casting.  He suggested I find someone with a sand casting shop or make it out of wood.  "The have been using wood on boats for a few thousand years," he didn't say too sarcastically.

I used Fix-It-All, but plaster would have worked just fine.
I just wanted something more accurate than tracing the
outline with a pencil.


This is what I took to Ron.  He is such a perfectionist that he gave me
three samples--one cut in the middle of the line, one to the outside of the 
line and another to the inside of the line. (His shop is cleaner that most 
restaurants and some operating rooms.)


I had a nice piece of  2-inch thick oak provided by crew, Tony. At this point, I could have gone over to the band saw and cut the plugs and sanded them down to an exact fit--well, a pretty close fit--I wanted it nicer.
So-- planed the board down so both sides were clean and parallel.  The oak board and the pattern then went to Ron who owns a Shop Bot and he created some 1 1/2 inch thick plugs of that fit the mast nicely.

I asked Ron to make three of these plugs because I am thinking that
I would like to improve the mast step on the keelson while we are this
deep into the project.


Next step: Fabricate the base for the mast step on the keelson.  Of course it won't be the mast step any longer; it will be the base for the king post.

Today's Cliche:  The Internet contains vast amounts of information, but not a scrap of judgment or wisdom.